Showing posts with label quilt mn. Show all posts

Monday, March 12, 2018

A Quilt Minnesota Retrospective

Today I'm sharing our new window display at the store.
We'll call it the Quilt Minnesota Retrospective.
And it's all about me, Pam Hansen, your friendly blogger!

Way back in 2008, I began a little journey into the land of designing and writing patterns.  I have learned so many things along the way!  Even if everything is proofread 3 times there can still be typos!  And math is really important!  I've learned ways to improve the formatting, and learned to create diagrams.  I've also been using photos in some patterns, so I've worked on making those as clear as I can without being a pro!
I've gotten pretty good at shooting the pictures for the pattern covers, with tips and ideas picked up along the way.  My son, Dan, is responsible for the template on the front and back of the pattern.  I send him pictures and text and he makes it work!

Debbie (store owner and therefore the boss) encouraged me to try writing some quilt patterns specifically using the exclusive fabrics designed each year for the Quilt Minnesota Shop Hop.  I thought sure, I'll give it a whirl!  And so the story goes.....!

I searched high and low in my house to find each year's special quilt.  The first year I only made a tablerunner, I didn't have time for anything large.  But from then on, I designed something different each year, and sometimes more than one!  When I got all of these displayed, I had to step back and take a deep breath!  That's a lot of work!


Slug Bug, Wound Around and Pie In The Sky
 Each year there is usually some sort of panel or border print or decorative scenes.  So I usually incorporated that whenever I could to just give customers ideas of how they could turn those into something more than they started with.

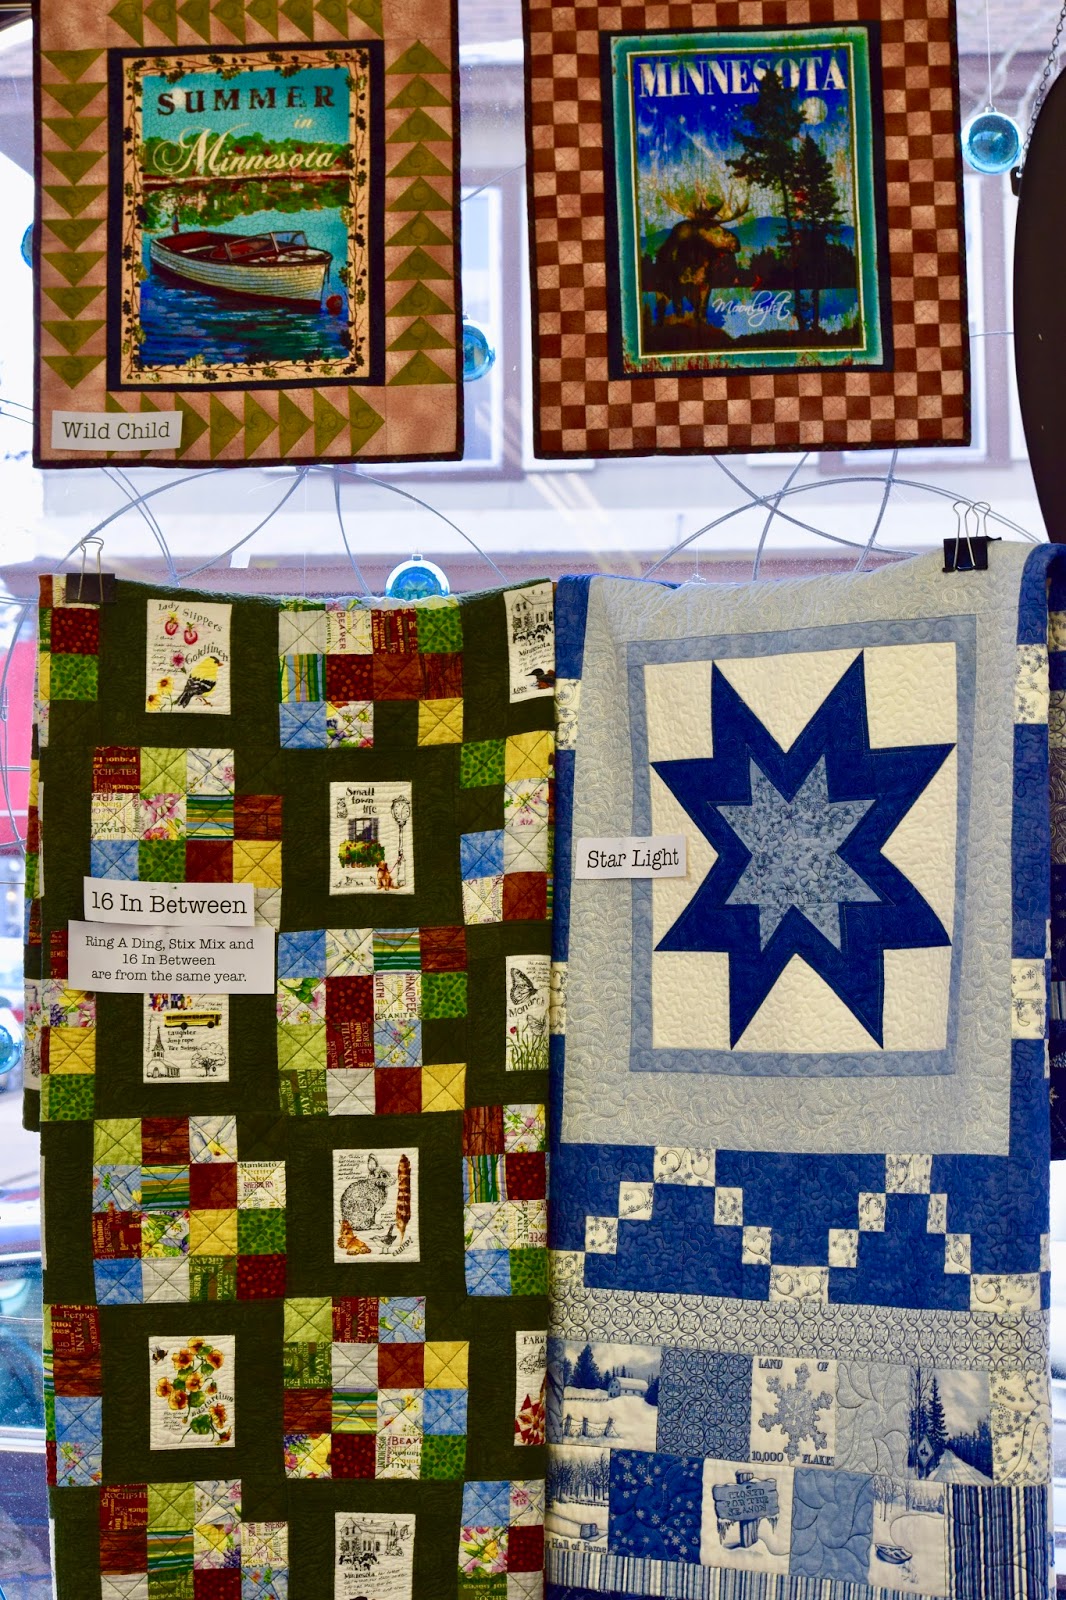
16 In Between, Star Light and Wild Child up above.

Pie In The Sky and Explore More
 I've used the row quilt layout more than once.  There are 2 examples in the picture below, although the quilt on the upper left isn't very visible.  The quilt on the lower left was made with fabrics originally designed by James Meger, a noted nature/outdoor artist.

Ten and Sweet Treat on the left, MN Mixer on the right.

MN Mixer, Connections and Stix Mix pillow below.
 The quilt on the right above is called Connections, and it is one pattern that I have made in multiple sizes.  The baby quilt is cute and just the right size!

Below are 2 patterns that are small items that were part of the collection - a tablerunner and a pair of tablemats for centerpieces.  
I've used that round tablemat design for making some Christmas gifts, too.
Ring A Ding and Winner Spinner

So that's the saga of my Minnesota quilts!  It's been an interesting endeavor, and it's been fun to see many patterns come to life in fabric.  We always make up some kits for the quilts, and I've taught some as classes.  The 2018 fabrics can be viewed online but we haven't received any bolts yet.  I'm wondering what I will come up with this time?

Sunday, August 20, 2017

The Fab Floor Cloth

One of the most frequent questions we get is about our floor cloths.  We think they are a unique and fun way to display and use special fabrics.  Debbie makes a new one every year for the MN Shop Hop.  We keep it on the floor right in front of our cash register counter, a place that gets lots of traffic.  It gets walked on all the time, and lasts through wet shoes, sandy shoes, slushy shoes and salty shoes.


We've shared the instructions on this blog before so I will reprint them here.  We also hand out those instructions to anyone in the store who is interested.  You can make your own floor cloth to the size that you want, from big all the way down to coaster size!  The multi-purpose cloth (by Roclon) that is the foundation for our floor cloths is 54" wide. That would be the max width of a floor cloth but the length could be longer than that because we buy it on a roll and sell it by the yard.
If you are planning to make your own floor cloth, the usual size container of Mod Podge is not enough.  You are better off to watch for it on sale at a craft store and buy the big container.

Mod Podge Floor Cloth
Supplies:
 Mod Podge   
Fine grit sandpaper or steel wool    
Multi Purpose Cloth    
Fabric for the front and back
   Foam Brush   
Plastic Drop Cloth to protect work surface

Directions:
1.  Cut the main fabric and the backing one inch larger than the desired finished size of the floor cloth.
2.  Cut the Multi Purpose Cloth to the desired finished size.
3.  Apply Mod Podge to one side of the Multi Purpose Cloth. 
Immediately attach backing fabric to the Mod Podged surface, smoothing out wrinkles and bubbles.
4.  Apply Mod Podge to the backing fabric.  Let dry 1-2 hours.
5.  Trim backing fabric even with the Multi Purpose Cloth. Use your rotary cutter for an even trim.
6.  Turn the floor cloth over and apply Mod Podge to the other side of the floor cloth.  Center the main fabric on the floor cloth so that you will have fabric to wrap to the wrong side of the cloth.  Smooth out wrinkles and bubbles. Let dry.
7.  Sand lightly with steel wool or fine grit sand paper, if desired.
8.  Repeat so that you have 4-5 layers of Mod Podge on the front and 3-4 layers on the back, sanding between coats.
9.  Wrap excess front fabric to the back side and apply Mod Podge under the fabric to hold it to the floor cloth and over the fabric so that it will also be finished.  If desired, Mod Podge one inch strips of fabric  to cover the raw edges of the wrap around fabric for a more finished look.
10.  Apply Mod Podge to the back side one more time.

You can get as creative as you want with fabrics in assorted colors, shapes and sizes.  You can make it look like quilt blocks, or a collage, or a Van Gogh!

Thursday, June 1, 2017

The Magic Quilt Coach!

It's time to get the party started!
We are preparing samples using the new Quilt MN fabrics 
and taking orders for those fabrics.
Plus...
A great bus trip opportunity!


You really can't go wrong for that low price -- no hassles with traffic, construction, parking, map reading or GPS following, re- fueling, timing stops, etc., etc.  And, you know we'll have some treats for your snacking pleasure!  Plus, we do have a bit of fabric and all kinds of patterns to tempt you!  We will have a great display of quilts and projects with patterns and kits for you, too!  And, as a bonus, you get a pack of 5" squares of Moda's Grunge fabric line, one of our most popular "blenders" 
that coordinate with so many things!

So don't miss the bus, call 651-429-1039 to reserve your seat on the Magic Quilt Coach!


Monday, August 15, 2016

Quilt MN Shop Hop Ends for 2016

The Hop might be over, but there's still fabric to claim for your own!  On the final day of the Quilt Minnesota Shop Hop, these are the bolts we have remaining--


Still several to choose from.  As we've heard from many visitors, we are out of some of the same things that many shops are.  Namely:  Brown and Orange texture lines, turquoise dots, multi-colored theme stripe, colored fish and mosquitos.  Not a single mosquito left in the store!  You would think maybe the Mosquito Control people had visited Bear Patch!
Also, we still have 5" and 10" square packs remaining.

Since the shop hop rules explicitly state that the fabric group cannot be sold at a reduced price for 1 year after the shop hop, we have been holding onto some of the 2015 fabrics!  Starting today, whatever we have left is marked down to $7/yard and 5" square packs also $7 each.  Here's your chance to pick up some good deals on those fabrics!  As a reminder, here's what the theme fabric looked like last year.  Still very charming!

Are you wondering what 2017 will look like?  So are we!

We still have the Row By Row Experience continuing, with your free pattern available for the asking, through September 6.  We still have kits available for our row, too, in 2 colorways.  Shown below is the funky fabric colorway, and the other is black/white with primary colors.  These happy houses are paper pieced, and designed by Mary of MH Designs.  She's a master at paper piecing, so you know this pattern is done right!  She's also a loyal friend of Bear Patch, and we so appreciate her talent.

During our Row By Row period, because it is a national endeavor, we have a big map and ask people to pin their home location.  We have so many pins!


But here's the deal--we need a few more states to show up!  We need:  West Virginia, Delaware, Rhode Island, Mississippi, Louisiana, Maine, Vermont and New Mexico.  If you live in one of those states, we need you and you still have time to plan a trip to Bear Patch, so come on down!  You will make our map complete!

Tuesday, August 9, 2016

The Floormat Again!

It's time for the floormat once again!
Debbie has become a pro at floorcloth design and production, 
 I think this is the 4th year in a row for this project.    
The directions are over here on a previous post.
The design ideas are unlimited.  This time she used 5" squares and letters about 4" high from cardstock, purchased at a craft store.  The RocLon Multipurpose cloth can be cut to any size you wish.  We do have it in stock in the 54" size.  The Mod Podge is also available at most craft stores, but don't get the small size.  I think Debbie used up one 32oz. bottle and had to start on another one to get all the coats done.  So look for the family size!


And a note about durability--we used the 2015 floormat on our floor right in front of the cash register counter all year long.  That's the spot that probably gets the most traffic in the entire store.  And it shows very little wear and tear after 12 months of heavy use.  And now it's time for a new look for another year!

Tuesday, August 2, 2016

Hot Pot

Looking for a quick and easy pattern for a handy hotpad?  During Quilt MN, we like to tuck a little bonus into the bag given to all shop hoppers.  The bag contains directions for the block that Laurel put together, each store has a different block so you can collect them at each store and use them any way that you like.  Each bag also contains a 5" square of one of the limited edition shop hop fabrics.

This year, I made up this nice hotpad with directions for everyone.  I had to squeeze all the directions into a small space, which limits how much can be included.  So, I've taken pictures of the steps and have them organized here for you!  Please use a walking foot for this entire project!  It makes a world of difference.  If you don't have a walking foot, please make sure you get one.  It is irreplaceable for sewing multiple layers, as in straight line quilting.  I also don't do a binding without it.

It starts with a 4 1/2" square, centered on a piece of heavyweight cotton batting.  I recommend Quilter's Dream Cotton Deluxe batting.  Mark an "X" from corner to corner of the 10 1/2" batting square.  This gives you a place to center that 4 1/2" square.  Each corner of the square should be positioned right on the lines:


Lay a 1 1/2" strip on the side of the square, right sides together, and sew the 4 1/2" length through the 2 fabrics and the batting, using 1/4" seam allowance.  No need to backstitch:


Trim off the long tail of the strip in line with the edge of the square:


Finger press the strip open:


Continue sewing strips around all 4 sides of the square:


This is a good time to do just a little planning.  Although random is a good idea for something like this, if you do have a limited amount of strips, think about what 4 fabrics you will want in the last row because they have to be the longest.  Or, if you don't have any long strips left when you get to that stage, just sew some shorter ones together and use them that way.

Continue with another round on all 4 sides:


And then one more round!  You will have reached the edge of the batting, maybe a little more, maybe a little less.  


Make a little loop of cord or ribbon or fabric, about a 6" piece.  Position as shown below at the upper left edge of the potholder, about 1" away from the left corner.  Pin or baste in place:


Layer the quilted square with the insulbrite batting and the backing fabric, all about 10 1/2" square.  If they aren't all the same size, trim as needed to make them the same.  The makers of insulbrite state that there is no right or wrong side of the batting.  Layer the insulbrite on the bottom, then the quilted square right side up, and finally the backing right side down:


Sew around the square, using 3/8" - 1/2" seam allowance.  Leave an opening about 6" long in one side for turning.  Trim the bulk away from the 4 corners as shown below:


Now, turn right side out.  Poke out the corners to look neat and as close to square as you can manage.  Hand sew the opening closed.  Machine stitch around the outside edge about 3/8" from the outer seam.  Stitch in the ditch around the 3 rows of strips.  


Now go cook something!
Pam

Sunday, July 31, 2016

Sewing Tips for Ten!

There are some tips and information that I want to share with you regarding my new quilt pattern, Ten.  This is kind of an add-on bonus to the printed directions for Ten.  The Ten pattern is available for purchase at Bear Patch. 
Ten by Emmaline Design
Quilt MN 10th Anniversary
The blocks in Ten used quite a few of the "corner squares", AKA "snowball", or "cheater corners".  I re-named them because in my opinion, it's not cheating to build a better block and improve on techniques!
When I first learned quilting, in 1980, things were mostly done by hand.  So I learned that to make a piece that looks like this:


I would use a triangle template and a matching strip that was cut at a 45 degree angle on both ends.  Simply hand stitch on the seamline, and you've got it!

Then came the sewing machine revolution!  We discovered that our sewing machines could stitch together quilt block pieces in a fraction of the time of hand sewing!  We went through a period of adjustment and acceptance before this machine work was viewed as legitimate.  When I started attending my local quilting group, Ham Lake Piecemakers, the majority of the group did entirely handwork.  Or maybe they were learning to piece by machine, but always quilted by hand.  Thanks to a few friendly and open-minded members, they took me in anyway!  Now the tables have turned, and those who do hand piecing and hand quilting are few and far between.  I still dabble in the art of hand quilting a bit, but I love my machines!

So now, there is a method to make those little triangle pieces on the corners of a larger strip or square or rectangle by machine.  By stitching a diagonal line across a square shape and the larger shape beneath it, we can mostly eliminate any problems with stretch on that bias edge.  But, we need to practice accuracy or else we get sloppy results.

There are 3 methods I am going to cover for this technique.

1.  Place a strip of masking tape on the bed and tabletop of your machine, in line with the foot.  It only needs to be about 4" long.  Mark a straight line down the tape.  Put the needle down and center the marked line with the needle.  Make sure it isn't slightly angled one way or another.  Don't let the tape come in contact with the feed dogs.  That would really screw things up!  Feed one corner of the little square to the needle.  Keep the opposite corner of the square on that center line as you continue to feed it into the needle.  No need to backstitch because these will be sewn into another seam later and prevent the ends from loosening.
Drawback:  this doesn't work with large pieces because you can't get a line of tape extending forward far enough to accommodate something like an 8" or 10" square.  Depending on the type of tape used and how long it's left in place, you could get some gummy residue.
Advantage:  it's cheap!


2.  There are several products that can be purchased to use instead of the masking tape.  These all afix to the bed and tabletop of your machine in some way.  Probably my favorite is Clearly Perfect Angles.  It is a "cling-on" sheet of plastic that has the markings for the diagonal seams, plus more.  There are directions for using the additional markings in other piecing.  Plus, if you are sewing garments, there's a 5/8" line printed on the plastic to guide your fabric.  Here's a link to a short video demonstrating some of the features of this product.
Drawback:  purchase required, and you have to remember where you put it!
Advantage:  it is easy to put in place and has the option to be left in place indefinitely (so you don't have to remember where you put it!).


3.  Draw a pencil line on the wrong side of the little squares from corner to corner.  Use a ruler that's small enough to be convenient and just a little longer than that diagonal line needs to be.  It's best to use a sheet of very fine grit sandpaper on the table top.  You can even purchase sandpaper boards.  The grit holds the fabric still but isn't rough enough to make a bumpy surface.  If you have the fabric on a smooth surface and apply much pressure to the pencil, you can get a little "wave" of fabric just ahead of the pencil, and that inevitably turns out crooked.  Use a mechanical pencil to keep a sharp point and fine line.
Drawback:  takes longer to prepare
Advantage:  very little expense required (sandpaper and mechanical pencil).

Now, let's talk about a pressing matter:
You might have noted that quite a few of the newer patterns call for pressing your seams open instead of to one side.  If you have made garments, pressing seams open is the norm.  For a long time, we have had it drilled into our quilting brains that we always press seam allowances to the side, usually the darker of the 2 fabrics.  I'm not 100% sure of why that was the absolute correct way to do it, but I have a theory!  When seams were hand stitched with a running stitch, there could be little gaps visible if the seams were pressed open and then stretched.  By pressing to one side, anything visible through a tiny gap in stitches would just show as ordinary fabric.
Flash forward to today, with machines that sew a neat and tidy seam, and there are no gaps!  So if that was the reasoning behind the pressing question, it now is invalid.  And we can press any direction we want!  When I have some bulk in the seam at points where seamlines cross, it can look much neater to press open.  And I have a handy little helper for that!


The Strip Stick!  It's a fabric covered stick, flat on one side and slightly curved on the other, and available to purchase at Bear Patch.  When I lay the seam on the curved side of the stick, it is easier to get the tip of the iron started on the seam correctly between the 2 layers, and continue the length of the seam.  There are several lengths available, I use the 18" size for all of my needs.  I can press one section, then slide and reposition for the next area.

Give it a try--you might just be surprised at how you like it!  

I hope that this is some help to you not only for your Ten quilt,
but many other sewing and quilting uses.   If you are interested in purchasing the Clearly Perfect Angles and/or Strip Stick, please contact the store at 651-429-1039.
Pam

Friday, July 29, 2016

Quilt MN 2016!

Enjoy our gallery of quilts and displays celebrating the 10th birthday of Quilt MN!

Click to play this Smilebox slideshow
Create your own slideshow - Powered by Smilebox
Free picture slideshow made with Smilebox

Tuesday, August 11, 2015

Shop Hop Samples

I have badly neglected our store blog, there's really no excuse other than life lately has been like a merry-go-round on a roller coaster!
Our very special employees really brought out their best and created 30+ samples using the Quilt MN fabric!  There are a lot of pictures here, so  
"Set a spell. Take your shoes off. 
                                                        Y'all come back now, y'hear?"
And now you'll have the Beverly Hillbillies earworm all day!
These samples will remain on display after Shop Hop ends, so you have time to see them for yourself.  Patterns and available kits, too.

Zippy Strippy bags by Atkinson Designs.
Linda added the silver buttons and beads on the zipper pull to really give it that extra little something!

Fat Quarter Pop Up by Fat Quarter Gypsy
Look for this class on the upcoming schedule!

Micro Safe Hot Holders by Indygo Junction
I need these!

Loon Pillow by MH Designs for Bear Patch Quilting Co.
Kits available!

Honeycomb Zipper Pouch by V and Co.
Laurel just taught a class on these bags, a neat fabric manipulation technique that you can do!
This is the Connections Tablerunner by Emmaline Design (that's me!)
The lap quilt was pictured in an earlier post and the pattern contains 6 sizes from tablerunner to queen.
I'm just about done with the baby quilt size.  I think a few kits remain for both this and the lap quilt.

Showy Lady's-Slipper by MH Designs for Bear Patch Quilting Co.
This embroidery design was created for an earlier Shop Hop, and when one of this year's prints was a mass of lady's slippers, Mary updated the pattern for a new look.  Complete pattern or an update to the earlier pattern are available.

Minnesota Lady's Slipper by Tracy Trevethan, exclusive design with custom hand-dyed wool just for Bear Patch!
 Tracy did beautiful work, and kits are available.

Triangle Frenzy Swirl by Bunnie Cleland
Use your 60 degree triangle ruler and any border print to make your own!

Tablerunner from Dress Your Table 2 from the Thangles people.
This pattern is one of 3 in the collection, along with the paper triangles to make it.

Sassy Strips by Pieced Tree Patterns, Val made and quilted this and it is one of the favorites!

Jelly Jive by Pieced Tree Patterns
This pattern might be our favorite jelly roll pattern.  I've made it 3 times!
Uses 42 strips + binding + backing.

Bow Tucks Tote, and old favorite
Prints Charming On The Go by Stitchin' Sisters
You know we love just about anything involving hexagons, so this was a no-brainer for display!

Ebb Tide by Villa Rosa Designs
Quick to make with big blocks.

Cabin in the Woods, another exclusive design by Tracey Trevethan.
She dies the wool herself, kits are available.

Ditty Bag by Patterns By Annie
Uses Soft & Stable for form.

Snap Tech by Stitchin' Sisters
Use metal carpenter's tape to make the top snap shut, and screening to help see what's inside there.
Perfect for cords, cameras, mouse, M&M's, etc.
Just checking if you are paying attention!  I would need a bigger bag!

Zippy Bag by Jen Fox Studios
Such a neat and professional looking bag, zippers all around!

Mom and Me Aprons by Atkinson Designs
Sizes for kids and adults, PLUS a chenille hotpad!
Who could ask for anything more?!

Eye Spy Case by Stitchin' Sisters
Keep those spectacles in a safe place, we know we can never find them when we need them!

Cell Phone Wallet
Kit includes the hardware.

I have misplaced the name for this tablerunner, I'll be back with more information!

Cranberry Chutney by Madison Cottage Designs
Uses a pile o' fat quarters, and we have many to choose from!