I just tried out a new product, and I want to tell you about it. It's G Easy Ruler Stickers from
GE Designs, designed by Gudrun Erla. It is a small pack of adhesive backed stickers to mount on the top of your rotary rulers. The little arrows will easily show any landmark measurements on your ruler to help your eye fine tune on the important spots. The pack is $7.99, and there are 192 re-useable stickers in the pack in 3 colors.
They can be used more than once, so this pack should last you awhile!
I have used some little post-it note arrow stickers and omni tape before for doing the same thing, but these are a big improvement. They stick better longer, and the bright colors are easier to see. Let me show you how I used them:
I needed to cut 2" wide strips for binding from this black and white stripe. I put 2 little blue arrows on the 2" ruler line close to me and then down at the other end. I only use the ruler markings for nearly all of my cutting, not the markings on the mat. So disregard any of the lines on the mat in the picture. With those arrows in place, I can easily line up the 2" line on the straight raw edge of the fabric and make my next cut. Then I leave the fabric in place and slide the ruler over to make the next cut. Slick, right?!
Now, here's an "orphan block" that is perfect for showing you how these little stickers help you trim and center your blocks. This measured about 9" square or something like that, and I decided it should be trimmed to 6 1/2" for this tutorial.
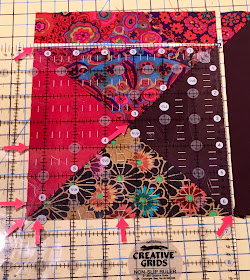
Can you see where I put all of the bright pink arrows on my ruler? A 6 1/2" ruler would be oh-so-convenient, but what if I don't have that size in my quiver of rulers? Well, I can use any ruler larger than 6 1/2" x 6 1/2" to do the job. Most of our square rulers have a corner that is what I call the "Zero Corner". That's in the upper right corner, and the inches grow progressively larger away from that corner. All the little arrows are on the lines that are 6 1/2" from that Zero Corner. I have also put an arrow on the point that is 3 1/4" from both directions, and that is where the center point of the block needs to be positioned.
Now I can slice off the right and top sides of the block
After making those 2 cuts, lift the ruler but don't twist or turn it.
Turn the fabric 180 degrees. The edges you just cut should now be
on the left and bottom sides of the square.
Above, the center arrow (at the 3 1/4" cross hairs) goes right on the center of the block "X".
Below, the lower left arrows on the 6 1/2" lines should be at those raw edges you just cut. The diagonal arrow and the diagonal line running from that corner to the opposite corner should lay right on the seamline.
The 6 1/2" mark at the top of the ruler and at the bottom right side of the ruler should be right on the fabric edge and the diagonal seamline, as shown below.
Now, trim off the top and right sides of the block. Ta-dah! A nice square 6 1/2" block with the center of the X in the center of the block, and the diagonal seamlines right in the 4 corners.
So, there you go! A very good way to use this handy new product from GE Designs! If you would like to purchase the arrow pack, call us at 651-429-1039 and we can send it on it's way to you!


No comments:
Post a Comment